Showing posts with label crafts. Show all posts

Saturday, December 30, 2023

From the archives: How to make a paper snowflake

[A version of this post was first published December 17, 2014]

These photographs were taken by a man named Wilson Bentley, who was born in 1865. He took his first photo of a snowflake in 1885 and went on to take over 5000 more before his death in 1931.

Images via Wikipedia


As you can see, real snowflakes have six points and so do the best paper snowflakes.  


Mostly made by Violin Daughter


Making snowflakes out of paper is a great activity, but it's pretty hard to manage six points.


This is a doily, not a snowflake.


This is pretty in its way, but it's not a snowflake.


To make a six-sided flake, you have to start with a six-sided piece of paper.  Getting there is kind of tricky, so I'm going to show you the way my daddy taught me do it.


This isn't a snowflake yet, but it will be.


Read the instructions below:

Wednesday, December 17, 2014

Tutorial: How to fold paper to make a snowflake

These photographs were taken by a man named Wilson Bentley, who was born in 1865. He took his first photo of a snowflake in 1885 and went on to take over 5000 more before his death in 1931.

Images via Wikipedia

As you can see, real snowflakes have six points.  Making snowflakes out of paper is a great activity, but it's pretty hard to manage six points.


This is a doily, not a snowflake.


This is pretty in its way, but it's not a snowflake.


To make a six-sided flake, you have to start with a six-sided piece of paper.  Getting there is kind of tricky, so I'm going to show you the way my daddy taught me do it.


This isn't a snowflake yet, but it will be.


First, you need a square piece of paper.
  • Fold the short edge of the paper diagonally across to the long edge, forming a right triangle. 
  • Cut off the part that extends past the triangle.
  • [I do this by folding the extra part and then cutting along the line.]

Fold, fold, open and cut.


Make your hexagon.

First fold: Fold the square in half, making a rectangle.

Second fold: The second fold begins about 5/8" to the left of the center of the folded edge.


Take the upper right corner and fold it at the left-of-center mark,making sure that the corner touches the bottom edge of the paper.


Third fold: Take the left side of the paper, and fold it across to the other side,


so it looks like this:


Fourth fold:  Fold paper in half.


Now you have to cut off all those weird corners sticking out of the end so it will have the right shape.  Turn it over so that the folded edge is down and the point is to the left, like this:


and cut it along this line:


If you open it up, it should look like this:


Now, fold it back up and again and cut the edges to make your snowflake. Just be sure NOT to cut off the point. A real snowflake is formed around a grain of pollen or a speck of dust, so it always has a solid center.


If you cut it like this


you'll get this shape.


Cutting it like this


will make this shape,


which isn't a scientifically accurate snowflake, but it's pretty and it DOES have six points.  Also it's quick and easy.


Have fun!

Monday, December 15, 2014

Paper handicrafts for Christmas, and more Sleepers Awake 2: Snowflakes edition

I love making paper snowflakes, but mine always tend to come out looking more like doilies than like snowflakes.

I made the tiny ones in the upper left of this photo. They DO have six sides, but they're not really snowflakey, are they?

Advent 2006
Where did the time go!?!

But last week I ran across this link showing how to make scientifically accurate snowflakes. I want those magazines, but I missed the Kickstarter by just a few days.

Anyway, we've been looking at the drawings posted there as we're making snowflakes this year.

Mostly made by Violin Daughter


Is creativity always this messy, or is it just me?

You should have seen it before I cleaned up the glue that leaked out during the night
and went down that crack and onto the floor.

Still making points for my Moravian star.  I found this beautiful paper at Hobby Lobby.  I'm in love.

When making paper snowflakes the most important thing is folding the paper so you end up with a six-sided shape and not an eight-sided shape.  I've looked all over the internet and can't find any clear instructions on this, so tomorrow I'm going to make a tutorial will post it as soon as I can.

~*~ ~*~ ~*~

I'm having a terrible time finding a good recording of the hymn Sleepers Awake -- most of the quality recordings are of an arrangement that's meant for performance rather than for congregational singing -- but this one's pretty good (the singing starts at 1:00).


Wake, awake, for night is flying:
The watchmen on the heights are crying,
     Awake, Jerusalem, arise!
Midnight's solemn hour is tolling,
His chariot wheels are nearer rolling,
     He comes; prepare ye virgins wise.
Rise up, with willing feet
Go forth, the Bridegroom meet:
          Alleluia!
Bear through the night
Your well-trimmed light,
Speed forth to join the marriage rite.

Sion hears the watchmen singing,
Her heart with deep delight is springing,
     She wakes, she rises from her gloom:
Forth her Bridegroom comes, all glorious,
In grace arrayed, by truth victorious;
     Her star is ris'n, her light is come!
All hail, Incarnate Lord,
Our crown, and our reward!
          Alleluia!
We haste along,
In pomp of song,
And gladsome join the marriage throng.

Lamb of God, the heav'ns adore thee,
And men and angels sing before thee,
     With harp and cymbal's clearest tone.
By the pearly gates in wonder
We stand, and swell the voice of thunder
     That echos round thy dazzling throne.
No vision ever brought,
No ear hath ever caught
          Such rejoicing:
We raise the song,
We swell the throng,
To praise thee ages all along.
Amen.

(Tr. Catherine Windworth, 1858, alt., 1940 Episcopal Hymnal version)


Friday, December 12, 2014

Paper handicrafts for Christmas, and more Sleepers Awake

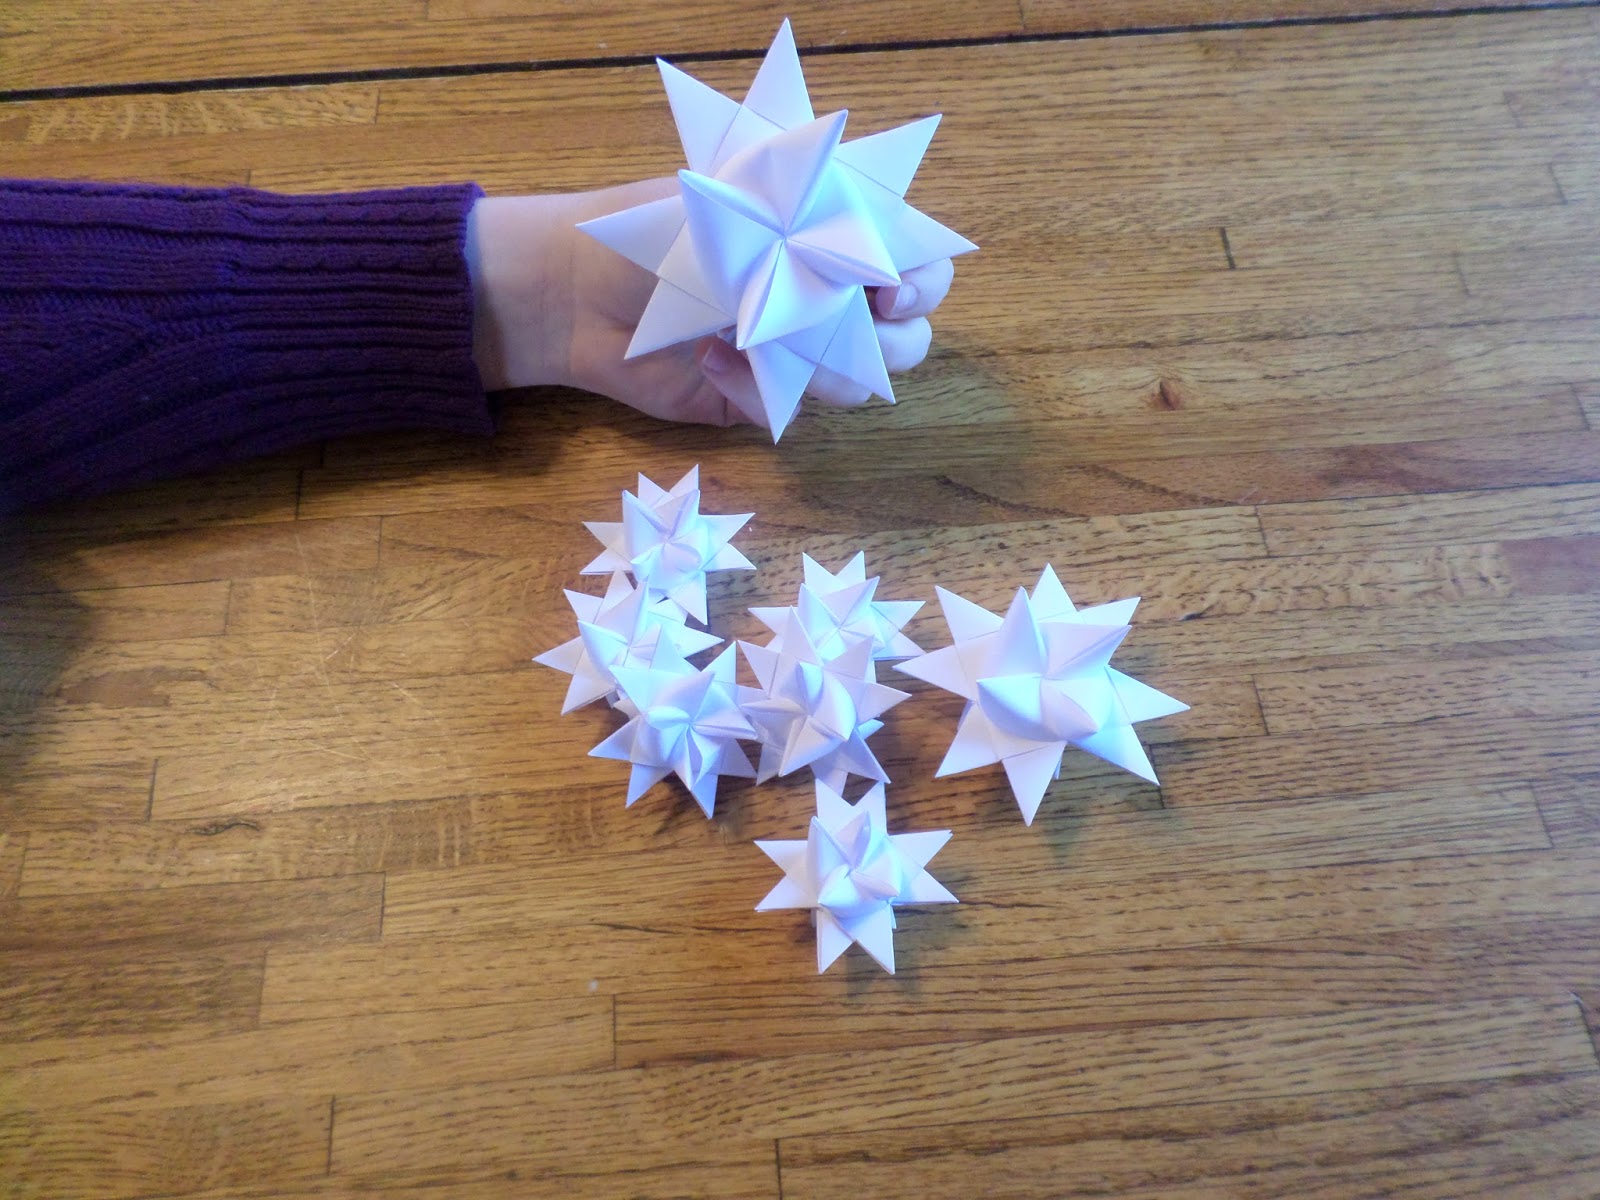
Last week Professor Carol wrote about Moravian Stars and included a link to a site that gives instructions in making something similar by folding and weaving long strips of paper.

Here are a few we made today:


I used legal-sized (8 1/2" x 14") copier paper for all the stars.  The size of the stars is determined by the width of the strips, and the strips must be at least 24 times as long as they are wide.  For the small ones, I used 1/2" x 14" strips.  For the medium one I used 3/4" by 28" strips (that's two 14" long strips taped end-to-end) and for the large one I used 1" x 28".  The larger ones were a lot easier to work with.

One of the ladies at the Ambleside Online Forum shared a link showing how to make a Moravian Star tree topper.  You start with a polygon for a base and then add cones to each face of it to make the star.  I've done the base so far, but this is a lot harder than the woven stars.

Base and template for points

That base is an icosahedron, which means that it has twenty sides.  Each face has three edges, so the points will be made of three-sided cones.

This thing sounds suspiciously like a geometry lesson, and in fact, the stars were orgininally created by a geometry teacher.

~*~ ~*~ ~*~

Here's a lovely rendition of Sleepers Awake played on the guitar.  Enjoy!


Tuesday, April 22, 2014

Dyeing eggs with onion skins

Something to file away for next year.

Last week Elaienar showed me this tutorial on a traditional Eastern European way of dyeing eggs for Easter, first decorating them with flowers, leaves, and feathers, then wrapping them tightly in onion skins and boiling in a pot of water filled with more onion skins.

Sunday afternoon, she and I went around picking pretty things and dyed a few, just to see how it would turn out and whether we would want to do it again next year. Decorating and wrapping them was such clumsy work that we only did a few and left the rest plain just to see how they’d turn out in the dye bath.

Take a look:


We used to have a hen that laid eggs a rich brown like that – I think she was a Wyandotte.


We used several yellow onions, but only had one purple one. Next time I think we’ll use all purple and see if we can get a redder color.

This one featues a dandelion:


And this one a goose feather:


The large pattern on this one was made with a cherry blossom and the smaller one at 11 o’clock was made with a violet. The “latitude” lines are caused by the texture of the onion skin.


In the picture below, the egg on the right features an azalea blossom, the one to the left of that, a few blossoms of lilac. I don’t know what plant caused the bright green leaves – it’s from a tree on our place. I think a sprig of chickweed is what made the fleur-de-lis pattern on the egg in the foreground.


The cracked and misshapen egg at the back happened because the shell crakced while I was wrapping it with string and I decided to carry on just to see how it would turn out. During cooking, the insides ran out and made it really hard to peel off the onions and the cherry blossoms and feathers I’d stuck on. Next time I would just throw an egg like that into the chicken’s scraps bucket and let them deal with it.


We’ll probably do it again next year, and if we get good enough at it, the next time I’ll use eggs that have been dried out first, so the finished eggs will last several years.

What do you think?


Oh, and next year?  I think I should remember to pick only edible plants, if we’ll be planning on boiling and eating the eggs – I don’t know why that didn’t occur to me while we were wandering around, picking things, and while a lot of it isn’t toxic I couldn’t identify some of the things we picked.  I guess we’ll be giving these eggs to the chickens in a couple of days.

Monday, November 21, 2011

Advent Tree

I can't believe it's nearly Advent -- this year just flew by!

This is an updated repost from last year.

~*~ ~*~ ~*~

Advent preparations

We've celebrated Advent with an Advent wreath nearly every Christmas since we married, but two years ago we added a new tradition: An Advent Tree!

It came about like this: We usually wait till just before Christmas Eve to get the Christmas tree and for some reason the kids always panic -- they always think we're not going to be able to find one this year. It almost happened once, ten or twelve years ago -- there had been a drought out west so there were fewer trees available than usual, and nearly all of them were sold out by the time we went shopping. We ended up with a Charlie Brown Christmas tree.

Well, six years ago when we first moved here to Virginia, we went to a church that put a Christmas tree up in the Parish house right after Thanksgiving, and had the children make ornaments on the first Sunday of Advent to put on it. Each ornament was decorated with, or made in the shape of, a traditional symbol that represents Christ -- a lamb, a cross, the Chi Rho, Alpha and Omega, and so forth. This style of ornament is called a "Chrismon," which means "Christ Monogram." I thought it was a neat idea and tried to figure out how to do it at home -- I mean, really, where would I put a second tree?

Finally I figured it out -- we didn't need two trees. All we had to do was put up the Christmas tree at the beginning of Advent, call it an Advent tree, and then decorate it with Chrismons. On Christmas Eve we could remove the Chrismons (or not) and add our usual Christmas ornaments. It worked out so well we did it again the next year and the kids are looking forward to it this year. We'll make the ornaments tomorrow so they'll have plenty of time to dry and can be decorated on Friday.

Here are the specifics (sorry I don't have any pictures -- I never have pictures).

Here's where you can find an explanation of Chrismons and a PDF file of patterns you can print out.

Here is a recipe for the ornaments. I cut them all out with a 3" biscuit cutter which is a nice size for decorating. The first year we used white fabric paint but last year I tried Wilton's fondant icing writer and sprinkled them with gold, silver, or pearl dust. They turned out beautifully. After Christmas we hung them outside for the birds. (Well, that was the intention anyway, and I thought we'd done it, but Elaienar tells me that none of them made it because the younger children insisted on saving them.)

The designs I have used are fairly simple -- Celtic cross, shepherd's crook, crown of thorns, cross and crown, eternity cross, IXΘYΣ, and several others that don't require much detail.

Thanksgiving weekend we put up the tree, with its lights and the star topper, a brass Moravian star, pierced, with a light inside. Saturday night before evening prayers, we turn on the lights (but not the star) and let the kids each pick one Chrismon to put on the tree, and talk a bit about the symbol and what it means. On Sunday we have the lights on all day, and that night we let them add a Chrismon, or one purple or silver ornament from our collection (purple being the color of Advent). The next week we add one Chrismon a day, but we leave the lights off until the next Saturday night. Then we do the whole thing over again so that the tree grows more and more festive as Christmas approaches.

On the 24th, we remove some of the purple and silver ornaments (because we have a LOT of Chrismas ornaments) and add the rest of our Christmas stuff. That night we turn on the star as well as the lights, and leave them on through Epiphany (except for while we were sleeping or away from home, of course). We take the tree down a day or so after Epiphany, and we generally start back to school on the next Monday, known traditionally as Plough Monday.

The kids love crafty stuff and I normally don't do much of that kind of thing with them, so it makes a nice change, and adding the ornaments day by day builds excitement in a way that's just perfect for this season of anticipation.

Monday, November 29, 2010

What the best-dressed teapots are wearing this season


.


My latest knitting project, I made this tea cosy based on a pattern found here: Super Simple Tea Cosy Pattern Generator. You type in your teapot's circumference and the page generates a pattern that makes the cosy the right size.

I used wool left over from two projects -- the brown is from a scarf I crocheted my youngest son a few years ago, and the green is from a shawl I made my sister to help her through her first bout of leukemia. There wasn't enough of either one for anything, but I liked the way they looked together and thought they'd go well with the Brown Betty teapot my oldest daughter gave me for Christmas two years ago.


And it really is simple. I'm still learning to knit, so until now I've only made dish rags and one scarf, which was just a very loooong dish rag. This pattern is two rectangles that you sew together, leaving openings for the spout and handle. The brown yarn is thicker than the green, which is why the brown part is wider.


New-for-me stitches include making the lacing eyelets, using two colors at once, and making I-cord for the drawstring.


Here is Lily, demonstrating how to put on the tea cosy:


... and how to pour tea while hugging big sister:

Wednesday, November 24, 2010

Advent preparations

We've celebrated Advent with an Advent wreath nearly every Christmas since we married, but last year we began a new tradition: an Advent Tree!

It came about like this: We usually wait till just before Christmas Eve to get the Christmas tree and for some reason the kids always panic -- they always think we're not going to be able to find one this year. It almost happened once, ten or twelve years ago -- there had been a drought out west so there were fewer trees available than usual, and nearly all of them were sold out by the time we went shopping. We ended up with a Charlie Brown Christmas tree.

Well, five years ago when we first moved here to Virginia, we went to a church that put a Christmas tree up in the Parish house right after Thanksgiving, and had the children make ornaments on the first Sunday of Advent to put on it. Each ornament was decorated with, or made in the shape of, a traditional symbol that represents Christ -- a lamb, a cross, the Chi Rho, Alpha and Omega, and so forth. This style of ornament is called a "Chrismon," which means "Christ Monogram." I thought it was a neat idea and tried to figure out how to do it at home -- I mean, really, where would I put a second tree?

Finally, last year I figured it out -- we didn't need two trees. All we had to do was put up the Christmas tree at the beginning of Advent, call it an Advent tree, and then decorate it with Chrismons. On Christmas Eve we could remove the Chrismons (or not) and add our usual Christmas ornaments. It worked out so well we're going to do it again this year. We made the ornaments yesterday and will decorate them on Friday.

Here are the specifics (sorry I don't have any pictures -- I'll see if I can get some this year and add them later).

Here's where you can find an explanation of Chrismons and a PDF file of patterns you can print out [link corrected].

Here is the recipe we used to make the ornaments. [Note added 21 November 2011: That link is dead now, but this one has the recipe and a clear explanation of the technique.] I used the first recipe at that link, cut them out with a 3" biscuit cutter. Last year we decorated them with white fabric paint but this year I'm going to try Wilton's fondant icing writer, but I have fabric paints on hand in case that doesn't work out. The plan is to hang them outside after Christmas for the birds.

The designs I used last year were fairly simple -- Celtic cross, shepherd's crook, crown of thorns, cross and crown, eternity cross, IXΘYΣ, and several others that didn't require much detail.

Thanksgiving weekend we put up the tree, with its lights and the star topper, a brass Moravian star, pierced, with a light inside. Saturday night before evening prayers, we turned on the lights (but not the star) and let the kids each pick one Chrismon to put on the tree, and talked a bit about the symbol and what it meant. On Sunday we had the lights on all day, and that night we let them add a Chrismon, or one purple or silver ornament from our collection (purple being the color of Advent). The next week we added one Chrismon a day, but we left the lights off until the next Saturday night. Then we did the whole thing over again so that the tree grew more and more festive as Christmas approached.

On the 24th, we removed some of the purple and silver ornaments (because we have a LOT of Chrismas ornaments) and added the rest of our Christmas stuff. That night we turned on the star as well as the lights, and left them on through Epiphany (except for while we were sleeping or away from home, of course). We take the tree down a day or so after Epiphany, and we generally start back to school on the next Monday, known traditionally as Plough Monday.

The kids love crafty stuff and I normally don't do much of that kind of thing with them, so it makes a nice change, and adding the ornaments day by day builds excitement in a way that's just perfect for this season of anticipation.